
SKETCH-UP
DRAWING OF WAVERLY
This is a model made using Sketch-up. This model consists of the main door, as shown below in the first picture, the workshop door, as shown in the second below photo with the far left door, and the west door shown on the second bottom picture on the far right.
The second black wall that appears is actually the curtain that encompasses within the entire room.

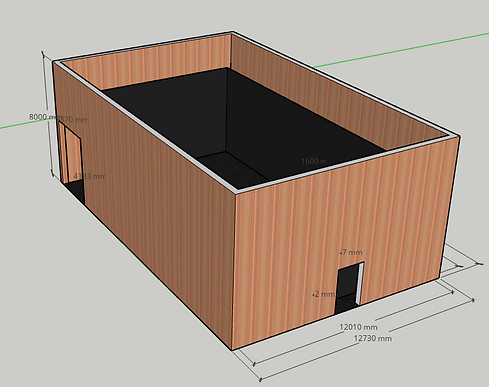

The above picture is from underneath the room, to show the measurements that i've added.
HOW TO:
I started off with making a rectangle with the measurements of 19820, 12010 mm. This created the base shape of the theatre.
Then to create the thickness of the wall, I used the 'Offset' tool which is the third one down in the selection box of the 'Push Pull' tool to the far left.
<-

I offsetted the thickness of the wall OUTWARDS by 360mm
Once I had one big rectangle with another rectangle inside of it, thanks to offsetting, I then proceeded to use the 'Push Pull' tool on the left hand side on the screen to pull up this 360mm thickness that is the wall.
->
I dragged this up to be 8000mm high.


To start drawing doors, I drew a line from one corner of the box along the bottom line, towards the centre by 9290mm. This gave me the point in which the door needed to be placed from that corner.


FOLLOW-ME TOOL:
This exercise was to get used to the different tools available and to be able to do more interesting and demanding shapes and designs for the future. This is my favourite design that I did:
THE THRONE
HOW I DID IT:
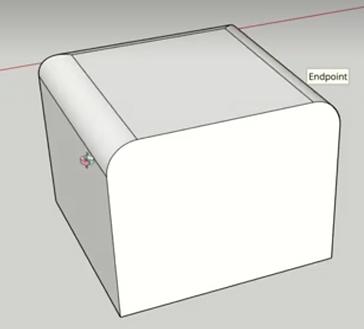
Firstly, I started off with a box, that had been pushed upwards using the 'push pull' tool.

I then selected the tool shown on the right. This created a 'two point arc.'

<-

I clicked and placed it along the top line on my square, and then whilst it was still active. i trailed alongside the side edge until the arc line went pink. This meant that it would create a perfect curve on the right angle.
If the line is blue, like the photo below, this means that it would create a curve, but a weird sharp curve and you would still have a sharp edge.

Next, I needed to finally use the Follow-Me tool. To do this, I selected the 'Push and Pull' selection bar and when the more options came up, I selected the middle one. This is the Follow-Me tool

<-

I hovered over the area in which needing trimming down using the Push and Pull tool until it had a little blue dotty hatched area. Once it shows this, its ready for that area to be cut back. When I click and dragged this, it showed the route it was going to cut out. Like this:
ALL SHAPES:
All of these photos are shapes that I did using the follow me tool:


Once done with all the sides, I just clicked twice and it instantly cut away all the top edges. Above it what I was left with.